Tuesday, October 29, 2013

Spideylicious Stop and Drop Halloween Treat

Last night for "family night" we dropped in on a few fun neighbors, just to say hi.  Of course we didn't show up empty handed, we brought a little Halloween treat...


A Spideylicious Halloween Treat!


Just a little loaf of caramel apple bread from Kneaders...shhhh, don't tell anyone...Kneaders is almost like homemade, isn't it?  And a very cute spider that Pebbles in My Pocket created.

Our visits were SPOOKTACULAR!
Happy Halloween!


 photo Kelliesign.jpg

Monday, October 28, 2013

Pumpkin Cheese Loaf....er....Bread MMMmmm Monday

This is one of my favorite fall treats to make. I just have one big problem with it....The name. The recipe comes from my mom. Not sure where she got it, but it is the perfect fall goodie to give away or snarf up yourself.
 
It's called Pumpkin Cheese Loaf.... I know, right? Terrible name. I think for the sake of saying it over and over I will now call it "Pumpkin Cheese Bread"
 This recipe does have several steps, but it is very simple to make.
 
Pumpkin Cheese Bread
 
Ingredients:
3 1/3 cups Flour
4 tsp. Pumpkin Pie Spice
2 tsp. Baking Soda
1 tsp. Baking Powder
1 1/2 tsp. Salt
2 2/3 cup Sugar
2/3 cup Oil
4 Eggs
1 lb can Pumpkin
2/3 cup Water
 
Cream Cheese Filling:
8 oz Cream Cheese, softened
6 Tbsp. Sugar
1 Egg
1/2 tsp. Vanilla
 
Topping Mix: (I double this)
2 Tbsp. Brown Sugar
2 Tbsp. Flour
1 tsp. Cinnamon
1/4 tsp. Pumpkin Pie Spice
1 Tbsp. Butter
Directions: 
Sift flour, pumpkin spice, baking soda, powder and salt. Set aside. Beat together sugar & oil until light. Add eggs, one at a time. Beat in pumpkin. Add dry ingredients alternating with water to sugar. Mix until all is well blended.
Grease 2 large loaf pans. Spoon 1/4 of batter in each pan. Spoon layer of cream cheese filling over each. Sprinkle with 1/4 of topping mix in each pan. Add rest of pumpkin batter. Finish with the rest of the topping.
Bake at 350 degrees for 1 hour or until tester is clean. 
TOPPING MIX: Mix dry ingredients. Cut in butter until mixture resembles corn meal. Set aside.  CREAM CHEESE FILLING: Mix cream cheese until smooth & creamy. Add egg & vanilla and beat well.

As you can see from the picture below, I didn't divide it as well as I should of so the filling is up a little high, but it still tastes just as great!
Enjoy!
 

Wednesday, October 23, 2013

Edgar Allen Poe Baby Shower - Guest Post

I asked my friend Heather Gardner from River City Cupcakes to Guest Post on a recent Baby Shower that she threw. This is such a fun idea and could just as easily be a Halloween Party:
 
    I was so excited when Jen asked me to guest blog on Chocolates for Breakfast! Jen is the "Ultimate Party Planner" so what a compliment it was to be asked.
    My amazing friend Sarah is about to have her 4th baby and since it's so close to Halloween we decided that an Edgar Allen Poe theme was in order. I love that she has such a fun sense of style and adventure!
We went through a few ideas of how we would pull off this Halloween baby shower and then it just hit me to search Pinterest for Edgar Allen Poe. Bam! Exactly what I was looking for. Elegant and a little creepy, not so much outrageous goblins and ghouls.

    We knew we wanted to keep the color scheme black and white and that really helped to narrow down what we needed. Most of the decorations were things we either already had in our homes or things we bought from the Dollar Tree. A couple exceptions were the ornament blanks, decorative bottles from Hobby Lobby, and some odds and ends from Target.

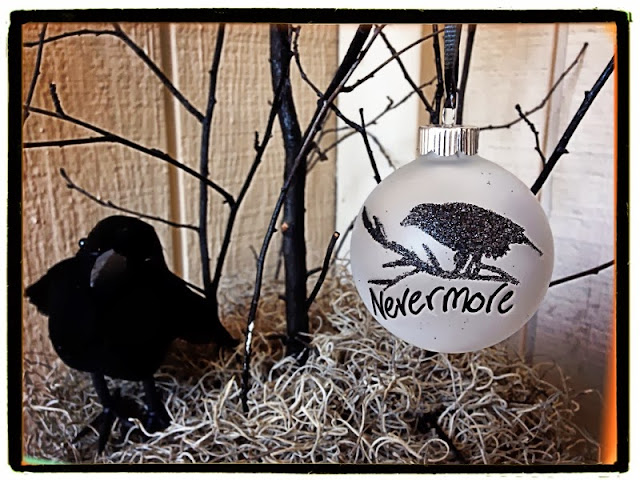
    The first thing I did was make some table top trees to display the ornaments. I spray painted some plastic planters from Dollar Tree and some branches I trimmed from my plum tree. I weighted the planter with a couple large rocks and then positioned the branches between them for stability. To hold everything together I used a can of spray foam insulation (available at Walmart for under $4/can) to cement it all in place. **Be careful when using spray foam! If it gets on your skin you will have a heck of a time getting it off. Lots of hot water and layers of skin later my hands are finally looking close to normal.** Spray foam doubles in size as it dries so be sure not to over fill your pot or you will have lots of trimming to do!
 
Once the foam was dry I spray painted that black and then used spray tack to adhere some Spanish moss to it. Voila! A lovely table top tree.

    Next it was on to the ornaments. Can I just say how FUN these were to make?! I didn't have a bird stamp so I created my own stencil by hand drawing a bird onto a piece of cardstock and cutting it out with my CutterBee razor. Then I used my VersaMark embossing pad with the stencil laid over it to transfer the glue to the ornament. Sprinkle your choice of embossing powder onto the image and shake away the excess. Heat set and you're ready to go! I added the word Nevermore using a paint pen and finished it off with ribbon. These became one of the favors the guests got to take home from the party.


    I also made little sour cream pouches filled with candy for favors too. (I really have no idea what they're called but they always remind me of the sour cream packs they have at Wendy's so that's what I call them). **Jen's Note - Find a tutorial on how to make Sour Cream containers here
    The main focal point for the party was the set up of the dining room table. This is where we arranged the tree, decorations, and sweet treats. We used period books to give height to different elements of the design and keep it visually interesting. Our sweets consisted of frosted bird and web cookies, bat wing Nutter Butters, ghostly brownie bites, Nutella fluffy dip with strawberries, and Adipose pops (because we are both lovers of Doctor Who).
 
           Our other set up area was the granite bar and this is where we kept the drinks, savory snacks, and crudités. I loved how fun and easy it was to make the "bone rolls". It's a can of crescent rolls that I pushed the seams together to form into a large rectangle. I then used my pizza cutter to make long strips of dough which I folded in half and twisted before tying into knots at either end. Brush with a bit of melted butter and sprinkle with grated Parmesan and garlic salt then bake as per package directions. So simple and so good. Just my style!
We didn't want to force baby shower games on anyone so there was a self service game area. We had play dough out to create mini babies and also a roll of ribbon to cut how much they thought was needed to fit around Sarah's belly. A lot of people played the games when they wanted to and the no stress style fit right in with what Sarah wanted.
     It was a great night and the guests commented on how great the food and decorations were. Now if only there was another party I could start planning!

 Thanks so much Heather! As you can see, she is a pretty amazing party planner herself. Visit her site for amazing cupcakes and other goodies!:
 Heather Gardner is the owner and operator of RiverCityCupcakes.com and has been featured in the KCRA A-List top 5 for the past 3 years.
 

Tuesday, October 22, 2013

Retro Homemaking

Our ward recently did a fun Enrichment night activity.
They got the idea from this blog. So cute! What a fun idea to get the ladies excited! My husband saw the invitation and said "Hey, you should go to that class on learning how to iron a shirt!" Nice try, husband. Nice. Try. I've never been good at ironing shirts. They set up a darling display of retro things like this fun milkshake machine,
These cute retro pattern's
and how cool is this old drive-in speaker?
 And these daily hand towels? Being a homemaker back then seems like it was a lot of work!
They asked me to teach a class on how to make a cherry pie. UHHHH....I've never made a cherry pie. Like ever. I've also never made a pie crust. I decided to go the modern route with a retro flare! I made these cute Cherry Pie's in a Jar that I found here
They were so easy, I mean easy easy easy- pre-made pie crusts and pie filling. It doesn't get any easier than that!
I set up the tables like an assembly line and just had written instructions at each step.


I was impressed by their creativity with the tops of the pies!
Bake at 375 for 45-50 minutes, add a scoop of ice cream and yum!
So delish!
 
Some of the ladies made cute retro aprons too


It was a fun night, but I am telling you - I am so glad that I live in today's day and age. I can take my husbands shirts to the cleaners, I can buy my clothes cheaper than making them and there is Pinterest!
 

Sunday, October 20, 2013

We've been Boo'ed - MMMmmm Monday

I love Halloween. It's one of my favorite Holiday's. I love decorating, making lots of fall goodies and most of all I love "Boo"ing people. It's a wonderful opportunity to get your kids involved in doing something for others and who doesn't love doorbell ditching!
 
I loved Kellie's White Chocolate Popcorn recipe from last week. It had been so long since I've made it, I forgot how much we all love it! I decided to make it monster style.
 
I made the white chocolate popcorn per Kellie's directions found here. After the popcorn is popped, marshmallows and white chocolate added, I added a few Halloween goodies.
I tossed in mini mallowcrème pumpkins, candy corn & spooky sugar eyeballs. Then I drizzled with some orange candy melts.
It turned out so cute and looked great in these cookie boxes I found at Michaels on clearance for $1.99.
 
 
If you don't have a poem on file, here are a couple links and directions to get the party started in your neighborhood!
 
Keeping Life Creative has some fun signs found here
Eighteen 25 has this cute tag found here
Uncommon Designs has these cute directions found here
 
 Happy "Boo"ing everyone!


Tuesday, October 15, 2013

Tickled Pink!

It's a Baby Girl...arriving soon.  The young women and their leaders wanted to throw a surprise baby shower for one of the very FUN ladies in our neighborhood.  Our surprise didn't go so well...she actually surprised us and we all had a great time.  This will be her first little baby girl!

Because of the multitude of guests that were invited we decided to host the party at our church, during our young women's activity time.  That presented a bit of a challenge because we wanted it to look like a baby shower.  We brought in a tri-fold door backdrop and decorated in PINK and more PINK.


One of the special gifts presented to the mommy-to-be was was this Service Coupon Book.


The black scrapbook was found at Hobby Lobby and each of the young women offered a gift of service for the new mommy and baby.  Things like home cooked meals, babysitting, FHE treats, personal assistants, etc.  The girls were generous with their time and talents.  
   

We also made White Chocolate Popcorn with splashes of pink for the guests.  


The Onesie Cupcakes were so cute and so easy to create.  Looked good enough to eat!


The Baby Carriage soda bottles were for the big brothers.


Sweet Baby Shoes for a sweet baby girl. 


White Chocolate POPcorn recipe found here


This baby is going to be the best dressed baby for miles...so many cute girly outfits.


Mommy-To-Be


Lots of fun gifts.


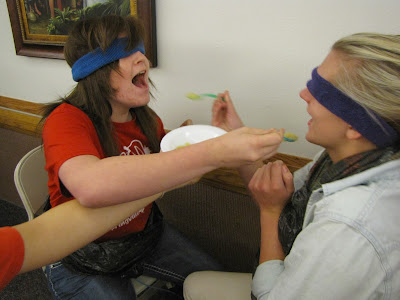
The Young Women organized several fun baby shower games.  Not just your average games...these were FUN!


Guests wrote on diapers for the new mommy AND daddy to read during changing time.


Bottle drinking challenge.  Our young women are good suckers!


Applesauce anyone?


Awaiting the arrival...


 photo Kelliesign.jpg