Monday, April 29, 2013

Mmmm Monday--Fruit Salad with Honey-Lime Dressing


After a long winter nothing looks better to eat than a beautiful fruit salad. I found this recipe on Pinterest and it just sounded so FRESH.  After serving it at a Garden Party we all agreed it was VERY delicious.

Fruit Salad with Honey-Lime Dressing - Easy
Yield: enough for a crowd

1 pt. container strawberries
1 pt. container blueberries
1 bunch (about 1 1/2 lbs.) seedless grapes (green, red or a mixture of both)
1/4 cup honey
juice from 2 limes (about 2-3 tablespoons)

Rinse strawberries, blueberries and grapes. Gently pat dry the fruit. Hull strawberries, then cut each in half; if large, cut into quarters.

Remove stems from blueberries, if any.
Remove grapes from stems.

Gently combine all three in a large bowl or aluminum tray. Set aside.

In a small bowl, whisk together honey and lime juice. Pour over fruit.

Refrigerate until ready to serve.


 photo Kelliesign.jpg

Monday, April 22, 2013

Cauliflower Cheese Spread


Don't you just love cauliflower!  I do...and if you don't try this and you just might!  This recipe was given to my family many years ago by my Aunt Cathy in Southern California.  She taught cooking classes at a local university and would always share her yummy recipes with us. This side dish is so quick and so delicious.  And because it's a vegetable it must be good for us...right!

Wash WHOLE head of cauliflower.  Place in microwave dish, cover tightly with saran wrap and cook till tender...but not mushy.


While cauliflower is cooking mix:
1/4 cup mayo
1 squirt mustard (any old kind)
finely minced green onions (as much or as little as you like)
1/4 cup shredded cheddar cheese
(I double this recipe if the head of cauliflower is large)


Once cauliflower is cooked place the cheese spread on top of the cauliflower head and return to microwave for 1 to 1-1/2 min. or until cheese is melted.
  

Serve!  It's just that easy!


 photo Kelliesign.jpg

Friday, April 19, 2013

NOW PLAYING...Teacher Appreciation Week 2013

TIME TO ROLL OUT THE RED CARPET...

WE LOVE TEACHER APPRECIATION WEEK AT OUR SCHOOL.  WE HAVE SO MANY TALENTED PARENTS THAT TAKE TIME OUT OF THEIR BUSY SCHEDULES TO SAY THANK YOU TO OUR WONDERFUL TEACHERS AND STAFF.  
BELOW IS JUST A SAMPLING OF WHAT HAS BEEN DONE FOR THIS FUN WEEK:

"NOW FEATURING" signs were on each teacher's door reporting the "EXTRA" exciting and fun things about them.


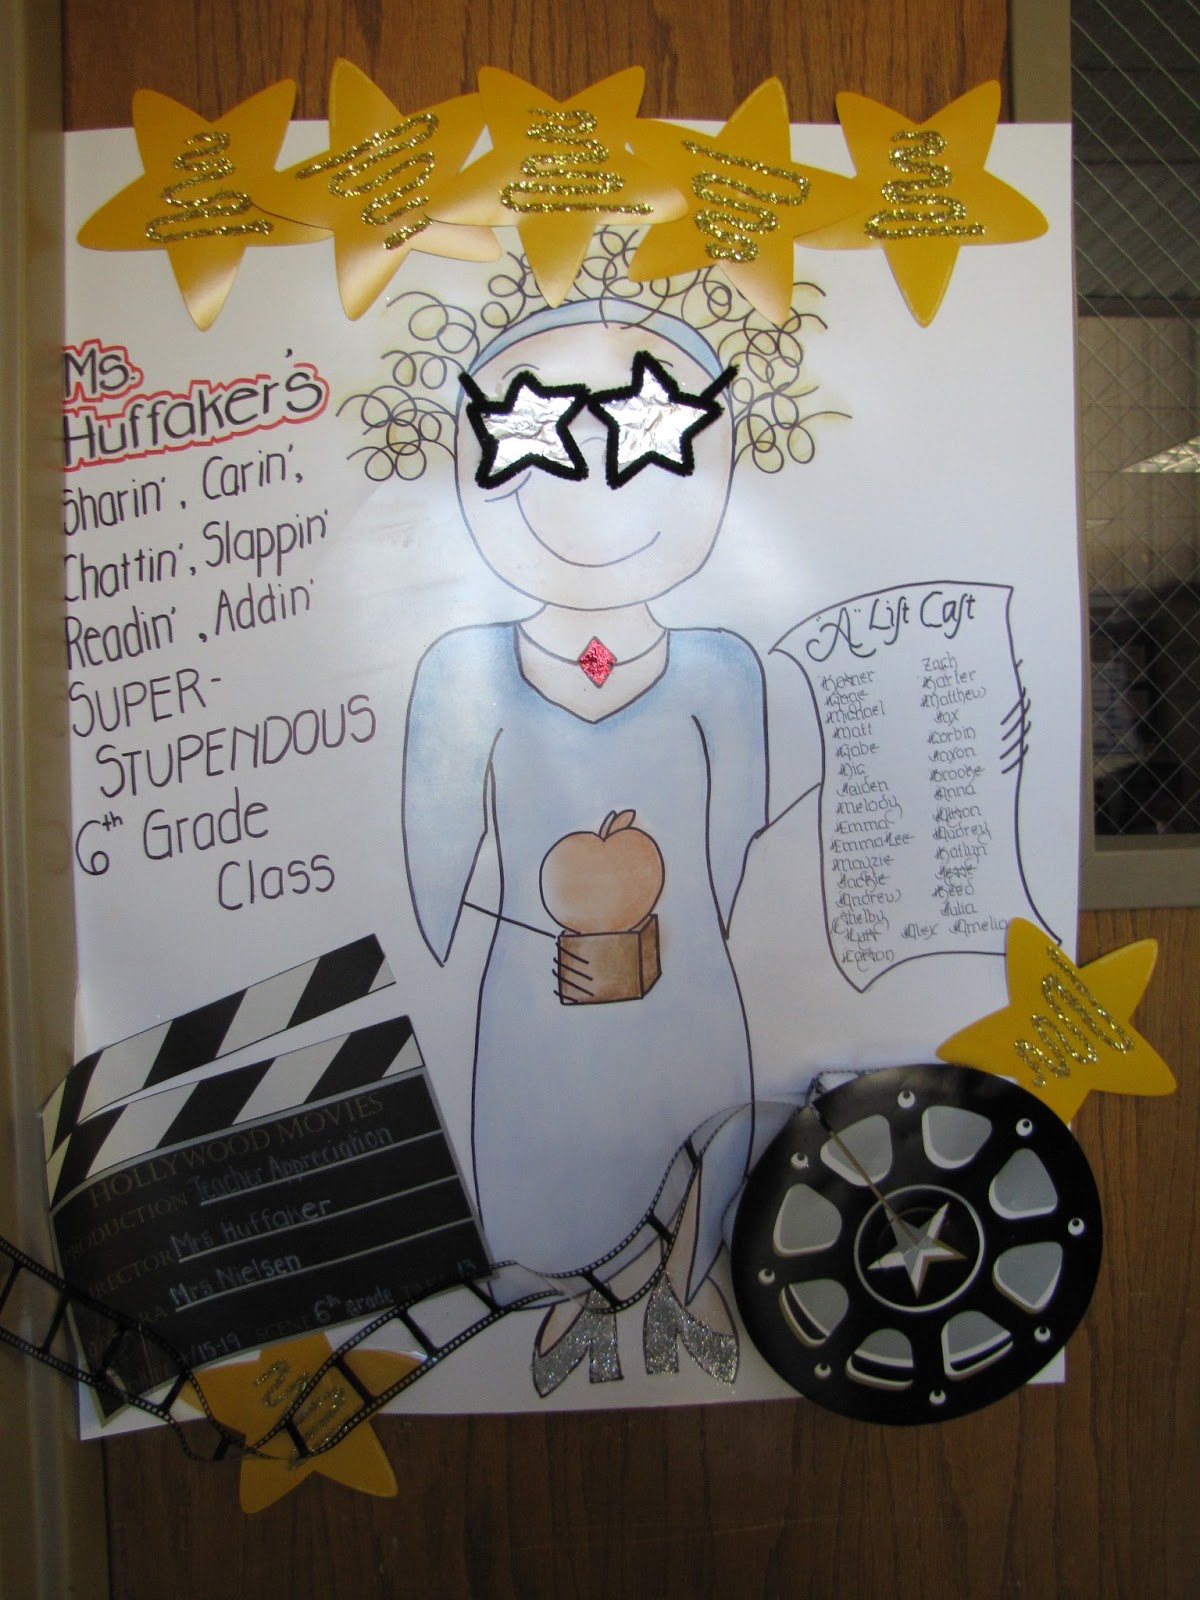
Parents spent lots of time decorating classroom doors.  All of them were FABULOUS!


 All teachers/staff received fun and yummy surprises in their 
IN BOX every day of the week.


The Teacher's Lounge was decorated in an Award Winning fashion.  Teachers and staff were served breakfast and lunch the entire week with Concession Snacks on Friday.


We even had a lighted marque!


NOW PLAYING
OUR TEACHER APPRECIATION COMMITTEE OFFERED SUGGESTIONS FOR STUDENTS TO SAY THANK YOU MONDAY THROUGH FRIDAY OF TA WEEK.

MONDAY:  
WRITE IN YOUR JOURNAL ABOUT WHAT MAKES YOUR TEACHER A SUPER STAR.
Kate also made cookies for her teacher and attached this ticket.


TUESDAY:
AS A SUPERFAN, SHOWER YOUR TEACHER WITH FAVORITE TREATS.
Kate wanted to give her teacher along with the principal, secretaries, librarian, custodian, etc. a little treat for this day.  Just a cello bag with microwave popcorn, personalized candy bar and the tag on top.


WEDNESDAY:
SUPER STARS ARE TREND-SETTERS.  WEAR YOUR TEACHER'S FAVORITE COLOR.
Kate wore her favorite BLUE outfit and thought her teacher needed just a little something more.  We bought a BLUE cup/straw from the dollar store, filled it with pretzel M&Ms and a Crystal Light packet, then attached the "Creative Juices" tag. 


THURSDAY:
TROUBLE ON THE SET!  YOUR SUPER STAR NEEDS SUPPLIES.  BRING A NEEDED ITEM.
This was an important one for Kate...not sure why but she wanted her teacher to have lots of supplies.  We found great teacher supplies, including a calculator at the dollar store, popped them in a cello bag, attached a bow and the fun tag pictured below.


FRIDAY:
ASK FOR YOUR SUPER STAR'S AUTOGRAPH.  SAY "THANKS".
This was my pick for Friday.  Our children have been blessed with great teachers all throughout their elementary years.  As a parent I am so grateful for GOOD TEACHERS.  And so many of them are still a part of our hearts today. 


 Kate adores her teacher especially when she reads and tells stories to the students.  She chose one of the Cuddle Me Quilts from our CFB ETSY STORE to gift to her teacher as a reading quilt.  We attached the tags (see below) and wrapped it in cellophane, "tootsie roll" fashion.


....AND THE CURTAIN CLOSES ON ANOTHER SUCCESSFUL TEACHER APPRECIATION WEEK!
WE HAVE GREAT TEACHERS...AND PARENTS!


 photo Kelliesign.jpg

Monday, April 15, 2013

Buttermilk Syrup

My 8th grade son is taking a foods class at school this year and loving it.  He and his buddies mostly like MEAT for their meals but last week he came home claiming to have made the best Buttermilk Syrup EVER!  He went straight to the kitchen to prove his point...made the syrup in record time, added a few pancakes and I have to admit it was pretty darn good.

Buttermilk Syrup
1 cup sugar
1/2 cup Buttermilk
1 stick margarine (or butter)
1/2 tsp. baking soda
1 tsp. vanilla

Bring sugar, buttermilk and margarine to a boil.  Turn off the heat and add the remaining ingredients.  Syrup will foam up so make sure your pan is large enough.  Make syrup just before you want to serve it because the foam will slowly dispense and the foam is the best part!  Refrigerate the leftovers.


 photo Kelliesign.jpg

Monday, April 8, 2013

Parmesan Cheese Toast

Do you have a favorite recipe that always seems to resurrect itself when you need it most?  This recipe is one of the favs.

A good friend shared this recipe with me several years ago.  There are so many talented people in my life and Toni is one of the best!  We never turned down an invite to one of her parties because you knew it would be awesome.  

Several years ago Toni served these Parmesan Cheese Toasts and after requesting the recipe (and she always shares her recipes) I found that it was a quick, easy crowd pleaser and it has since become a family favorite.

The ingredients for these yummy appetizers are often found in most pantries.  It's perfect for a dinner side dish, quick serve for hungry drop in friends and a great party appetizer.


Parmesan Cheese Toast
Mix:
1 cup mayo
1/2 cup powdered Parmesan cheese 
(must use the powdered or will not turn out)
1/4 cup grated green onion
Refrigerate for 1/2 hour (or longer) to allow flavors to blend.

Slice and butter french bread (or baguettes).  Arrange bread on a cookie sheet then spread Parmesan mix on top of bread.  Broil till bubbly light brown.

Best when served right out of the oven but still yummy when cold!

 photo Kelliesign.jpg

Thursday, April 4, 2013

3 Tiered Cupcake Tower


I saw this idea on a blog a while back and I fell in love with it. It's so shabby chic. I never thought I was a "shabby chic" person with my decor but I really love to mix that in with other decorating elements. I'm not going to post the whole step by step tutorial on this blog because some awesome blogger already did it. You can find all the materials you will need as well as her awesome step by step tutorial here. I will include a few steps though.
My awesome hubby cut the rounds out. The sizes are:
14"
10.5"
7.5"
I actually had him make three sets.
One for a birthday gift for Kellie, one for my crafty friend, Candice and one for me of course!! 
On two of them we used the 1x4 boards and glued them together and then on the other one we just used one piece of wood and cut into a circle. The finished product was exactly the same, so I would save the extra work and spend a little more money for the whole pieces of wood instead of the planks like the tutorial above. Unless you have a bunch of wood lying around that you want to use.
The candlesticks I got at Hobby Lobby and the wood and finial I got at Lowes.
After the wood was cut, I primed it and painted the dark brown in the areas I knew I would want to show through. Then I used the vaseline technique found here.
This is the first time I used the "vaseline technique". I was super skeptical if it would work right, but guess what. It does! It's so stinkin easy too. I love the look of it. 


Then I sprayed my top coat and after that was dry I used a rag to rub off the paint where the vaseline was applied. And voila! Here is the finished product!

 
This can be used in lots of ways. I'm sure I will use it for lots of future parties on my table. It was a pretty easy and short project believe it or not. (That is if your hubby can cut the wood out!)
 
Enjoy!
Here are a few ways Kellie and I have used our towers over the last few weeks.


So leave a comment and tell me if you are going to make it and what you would use this tower for?